LLDP (Link Layer Discovery Protocol) is an IEEE (Institute of Electrical and Electronics Engineers) standard protocol (IEEE 802.1AB) that defines messages, encapsulated in Ethernet frames for the purpose of giving devices a means of announcing basic device information to other devices on the LAN (Local Area Network) through periodic retransmissions out each port every 30 seconds by default. It is a standardized protocol similar to CDP (Cisco Discovery Protocol). It is a vendor independent link layer protocol used for network topology, troubleshooting and network management automation.
Benefits of LLDP
LLDP provides the following benefits:
- Simplifies the use of network management tools in a multi-vendor environment.
- Accurate discovery of physical network topologies that simplifies troubleshooting within enterprise networks.
- Enables discovery of stations in multi-vendor environments.
- Provides device capability and supports optional system name and description, and management address.
- Provides information that can be used to detect duplex and speed mismatches.
- Discover devices with misconfigured or unreachable IP addresses.
Frame format
In LLDP, each device sends information from each of its interfaces at a fixed interval, in the form of an Ethernet frame. Each frame contains one LLDP Data Unit (LLDPDU). Each LLDPDU is a sequence of type-length-value (TLV) structures. The EtherType field is set to 0x88cc. Each LLDP frame starts with the Chassis ID, port ID and TTL (Time-to-Live) or hop limit. The frame ends with the a special TLV named end of LLDPDU in which both the type and length fields are 0. The LLDP specification allows for organizations to define and encode their own TLVs. These are called Organizationally Specific TLVs and they start with LLDP TLV Type value of 127.
| Chassis ID
(M) |
Port ID
(M) |
Time To Live TLV
(M) |
Optional TLVs | End of LLPDU TLV
(M) |
M = Mandatory TLV (required for all LLDPDUs)
LLDPDU types
There are two types of LLDPDU: the Normal LLDPDU and the Shutdown advisory LLDPU. The Normal LLDPDUs provide management information about a local device to that device’s neighbor. This is the one transmitting mandatory and optional TLVs. Meanwhile, when a port is disabled, LLDP is disabled or the switch is rebooted, a LLDP shutdown frame is transmitted to the neighboring units, signaling that the LLDP information is not valid anymore.
Structure of LLDP Messages
LLDP exchanges information through specific units of data called LLDPDU. These data unit consists of TLVs and each TLV field corresponds to a certain type and length. LLDP standard IEEE 802.1AB has three TLVs that are mandatory at the beginning of an LLDPU in the following order:
Type 1 = Chassis ID (Identifies the device)
Type 2 = Port ID (Identifies the port)
Type 3 = Time to live (Tells the receiving device how long the received information should remain valid)
Following these mandatory TLVs, an LLDPDU can include additional, optional TLVs:
Type 4 = Port description (displays details about the port)
Type 5 = System name (displays given name for the device)
Type 6 = System description (displays version of the software)
Type 7 = System capabilities (tells the primary function and capabilities of the device )
Type 8 = Management address (shows the IP or MAC address of the device)
At the end of an LLDPDU the following TLV is mandatory:
Type 0 = End of LLDPDU (Signals the end of the data unit)
LLDP operating modes
An LLDP agent operates in any one of the following three modes:
- Transmit-only mode: The agent can only transmit the information about the capabilities and the current status of the local system.
- Receive-only mode: The agent can only receive the information about the capabilities and the current status of the remote systems.
- Transmit and Receive mode: The agent can transmit the local system capabilities and status information and receive the remote system’s capabilities and status information.
Whenever the transmit countdown timing counter expires or if the LLDP information has changed, an LLDP agent sends LLDP frames to neighboring LLDP-enabled devices. The LLDP manager takes the information inside the MIB (Management Information Base) and formats it into TLVs and inserted into the LLDPDU. When an agent receives this LLDPDU, it checks to make sure that it contains the correct sequence of mandatory TLVs, then validates optional TLVs. If there are errors, it gets dropped. While valid TLVs are stored in the neighbor database.
LLDP Media Endpoint Devices (LLDP-MED)
LLDP-MED is an extension to LLDP. This protocol is specifically used to support Voice Over IP (VOIP) applications. LLDP-MED enables network discovery between network connectivity devices and media endpoints such as, softphones, IP telephones, VOIP gateways and conference bridges. By default, network devices sends out only LLDP packets until it receives LLDP-MED packets from an endpoint device. It will then keep sending out LLDP-MED packets until the remote device to which it is connected to ceases to be LLDP-MED capable. It supports the following TLVs:
- LLDP-MED capabilities TLV
- Network policy TLV
- Power management TLV
- Inventory management TLV
- Location TLV
LLDP timers
- Hold timer refers to the time or duration that an LLDP device maintains the neighbor information before aging it. The default is 120 seconds. If the timer expires and no LLPD packet was received, the neighbor information will be discarded.
- Frequency timer pertains to the interval at which the network devices sends LLDP updates to neighboring devices. The default is 30 seconds.
- Reinit timer is the delay time for LLDP to initialize on any interface. The default is 2 seconds.
Basic LLDP Configuration
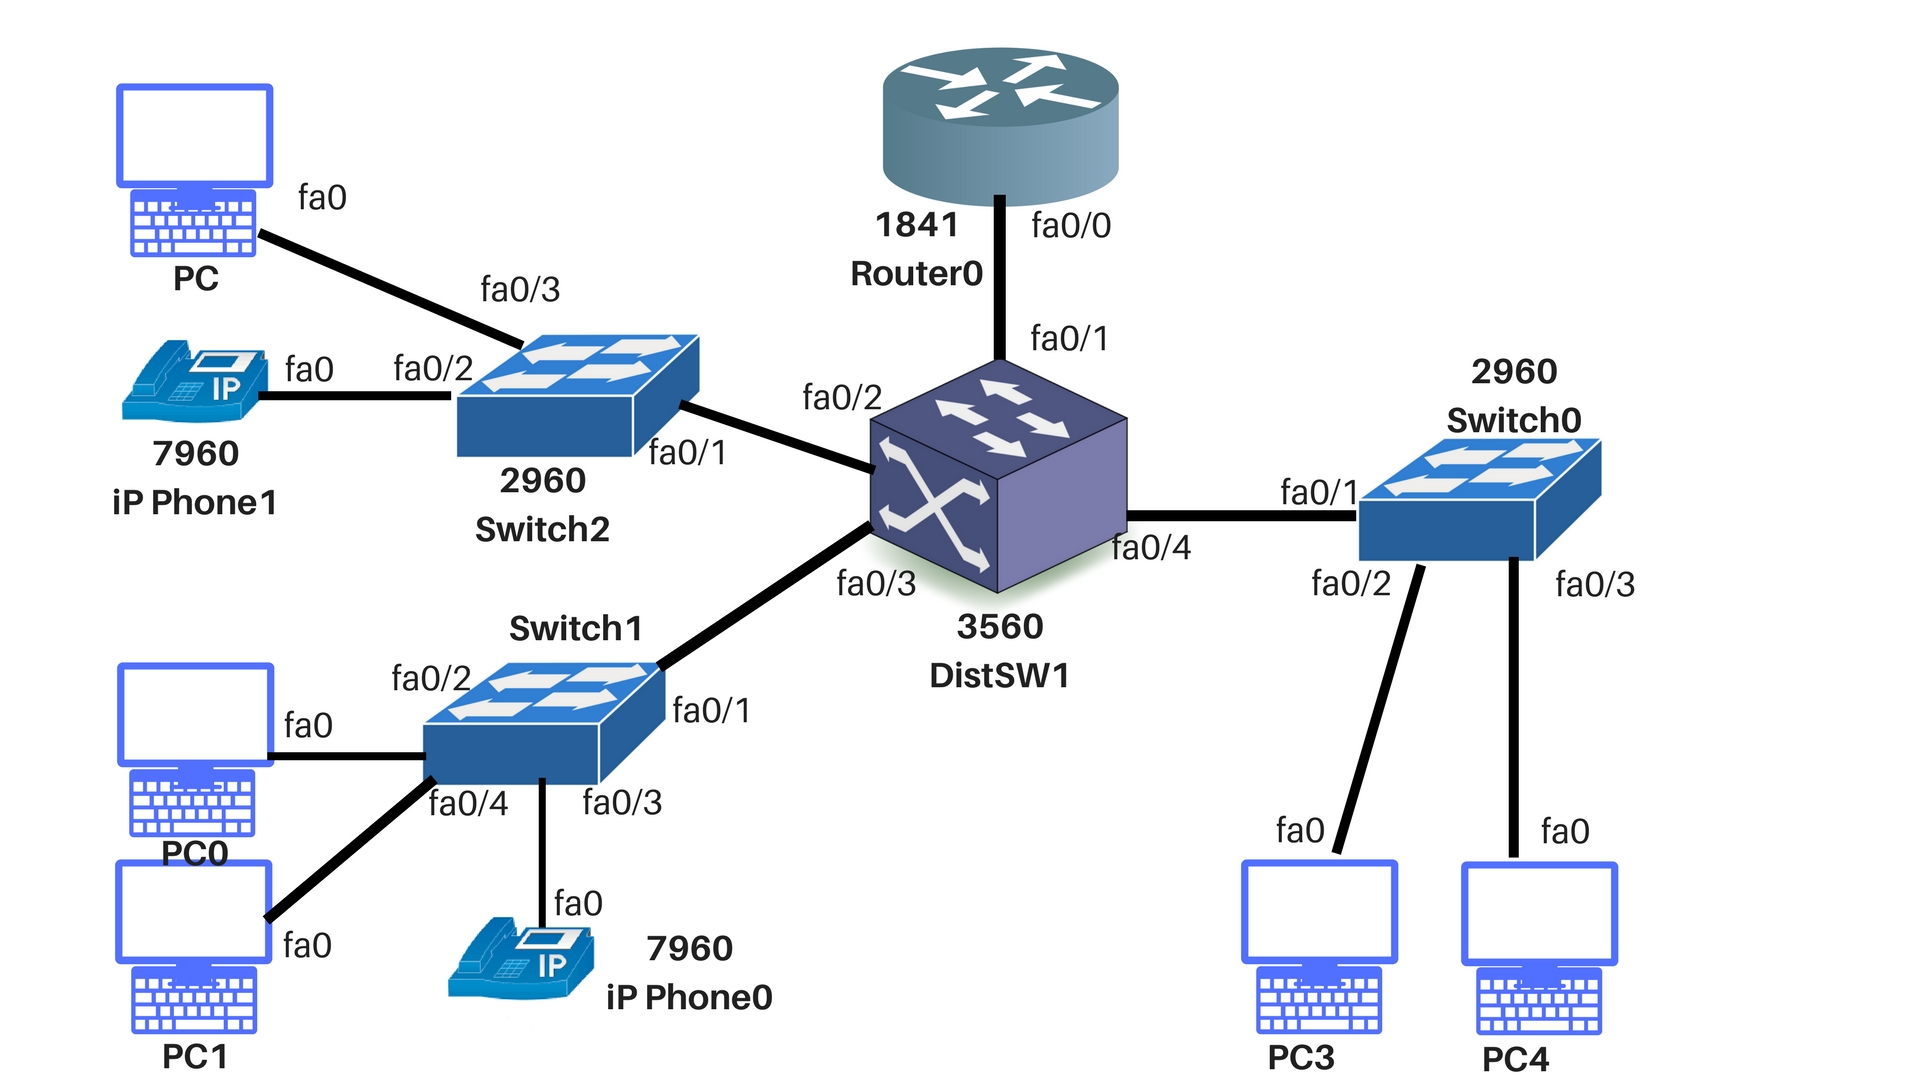
Before we dive into configuring LLDP, let’s create a simple network topology. This was created using packet-tracer. Our topology consists of one router which serves as the default gateway for the 192.168.1.0/24 network, one 3560 multilayer switch and three 2960 access switches where the endpoint devices like computers and IP phones are directly connected.
LLDP is disabled by default and can be activated through the lldp run command. Listed below are the following commands that we will implement on our topology.
| lldp run | Enables LLDP on device |
| no lldp run | Disables LLDP on device |
| lldp {med-tlv-select tlv | receive | transmit} | Enables an LLDP-MED TLV or LLDP packet transmit/receive on an interface. |
| no lldp {med-tlv-select tlv | receive | transmit} | Disables an LLDP-MED TLV or LLDP packet transmit/receive on an interface. |
| lldp med-tlv-select <med-tlv-name> | Enables specific LLDP-MED TLV on an interface |
| lldp holdtime <seconds> | Sets the hold time on device; range is 0 – 65535 seconds. |
| lldp timer <seconds> | Sets the rate at which LLDP packets are sent; range is 5 – 65535 seconds. |
| lldp reinit <seconds> | Sets the initialization time on any interface; range is 2 – 5 seconds. |
Disabling and Enabling LLDP Globally
LLDP is enabled by default. Follow these steps to disable LLDP:
- Enter global configuration mode
- Issue no lldp run to disable LLDP
- Return to privileged exec
On DistSW1:
Switch#conf t
Switch(config)#hostname DistSW1
DistSW1(config)#no lldp run
DistSW1(config)#end
And this is how to enable LLDP when it has been disabled:
- Enter global configuration mode
- Issue lldp run command
- Return to privileged exec
On DistSW1:
DistSW1#conf t
DistSW1#lldp run
DistSW1#end
After enabling LLDP Globally on our 3560 distribution switch, we will need to specify the interfaces which we will want to enable LLDP and enter their interface configuration mode.
DistSW1#conf t
DistSW1(config)#int range fa0/1-4
DistSW1(config-if-range)#lldp transmit
DistSW1(config-if-range)#lldp receive
DistSW1(config-if-range)#end
Configuring LLDP Characteristics
You can configure the amount of time for LLDP packets to hold the information before discarding it, the frequency of LLDP updates, and the initialization delay time.
The following commands are optional and can be performed in any order:
- Enter global configuration mode
- Issue lldp holdtime seconds command. This will specify the amount of time a receiving device should hold the information sent by your device before discarding it. The range is 0 – 65535 seconds; the default is 120 seconds.
- Issue lldp reinit command. This will specify the delay time in seconds for LLDP to initialize on any interface. The range is 2 to 5 seconds; the default is 2 seconds
- Issue lldp timer seconds command. This sets the transmission frequency of LLDP updates in seconds. The range is 5 to 65534 seconds; the default is 30 seconds.
- Issue lldp tlv-select command. This will specify the LLDP TLVs to send or receive.
- Save the configuration.
On DistSW1:
DistSW1#conf t
DistSW1(config)#lldp holdtime 120
DistSW1(config)#lldp reinit 2
DistSW1(config)#lldp timer 30
DistSW1(config)#end
Simply put the no form of each of the LLDP commands to return to the default setting.
Disabling and Enabling LLDP on an interface
LLDP is enabled by default on all supported interfaces to send and to receive LLDP packets.
The following commands will disable LLDP on an interface:
- Enter global configuration mode
- Issue interface interface-id command. This will specify the interface on which you are disabling LLDP.
- Issue no lldp transmit or no lldp receive. This will allow packets to be sent or received on that interface.
- Return to privileged exec mode.
To enable LLDP from an LLDP-disabled state, simply follow the steps above but issue the lldp transmit and/or lldp receive commands.
LLDP monitoring and maintenance commands
To monitor and maintain LLDP on your devices, perform the following commands, beginning in privileged EXEC mode.
| Commands | Description |
| clear lldp counters | Resets the traffic counters to 0 |
| clear lldp table | Delete neighbor’s LLDP information |
| show lldp | LLDP global config information |
| show lldp entry <* | entry-name> | Shows information about a specific neighbor. Use * to display all neighbors |
| show lldp interface [interface-id] | Shows information of interfaces where LLDP is enabled |
| show lldp neighbors [interface-id] [detail] | Displays information about neighbors or a specific interface |
| show lldp traffic | Shows LLDP counters, including the number of packets sent, received, discarded and number of unrecognized TLVs |
The two most important commands used for monitoring would be the sh lldp and sh lldp neighbors. The sh lldp command will display all the LLDP characteristics that we set earlier in the global configuration and the sh lldp neigh will show us all the neighboring devices connected to our local system. Remember that the lldp run command must be issued on each of the connected network devices for it to be displayed in the sh lldp neigh command.
On DistSW1:
DistSW1#sh lldp

Global LLDP Information:
    Status:   ACTIVE
    LLDP advertisements are sent every 30 seconds
    LLDP hold time advertised is 120 seconds

DistSW1# sh lldp neigh
Capability codes:
    (R) Router, (B) Bridge, (T) Telephone, (C) DOCSIS Cable
Device
    (W) WLAN Access Point, (P) Repeated, (S) Station, (O) Other
Device ID           Local Intf     Hold-time  Capability
Port ID
Router              Fa0/1          120        R
Fa0/0
Switch              Fa0/4          120        B
Fa0/1
Switch              Fa0/3          120        B
Fa0/1
Switch              Fa0/2          120        B
Fa0/1

Total entries displayed: 4
As you can see, all the directly connected devices are being shown with their capability codes, local and neighboring port and their corresponding hold timer.
Conclusion
There is so much more to LLDP and how it is being implemented based on different topologies, devices, and how the administrator decides to use LLDP to manage and monitor the network. For now we wanted to give you a good introduction to LLDP and its basic configuration on a small network.


7 comments
Exactly what I was looking for, thanks for sharing the information!
Preparing for a Cisco cert atm, and your LLDP content is the most complete and well explained I found.
Nice writing Katrina.
Very well constructed and in detail information on LLDP.
I look forward to read your articles on other networking topics.
Explained with details and found your article very useful.
thanks Wali!
Kat – great content. I love your posts and look forward to reading and learning more!
Thank you Chuck!